
Guide
Build, Deploy & Host an Astro Site with GitHub and Cloudflare Pages
Astro's architecture, a Git‑driven QA → live workflow, and Cloudflare Pages hosting — the exact stack behind this site.
This is the how‑to companion to From WordPress to Astro. That post covered the why; this one is the how — a complete walkthrough of the exact stack running the site you're reading: Astro, a GitHub workflow that gives you a separate QA and live site controlled entirely by your commits, and hosting on Cloudflare Pages. By the end you'll have a fast static site that deploys itself when you push.
Part 1 — What is Astro, and why it's built for this
Astro is a modern web framework for content‑driven sites — marketing sites, blogs, docs, portfolios. Its
defining trait: it ships almost zero JavaScript by default. You write components (in
Astro's own .astro syntax, or React/Vue/Svelte if you prefer), and Astro renders them to plain
HTML at build time. The visitor gets fast, static pages; the browser doesn't download a framework
just to show text and images.
The pieces that matter:
- Static‑first. Pages are built once and served as files — quick everywhere, and excellent for SEO because crawlers get real HTML, not an empty shell that needs JavaScript to render.
- Islands architecture. The interactive bits of a page are isolated "islands" of JavaScript; everything around them stays static HTML. You ship JS only for the parts that genuinely need it.
- Content as files. Pages and posts live as Markdown or components in your repo — which makes the whole site version‑controlled and diff‑able in Git.
- Familiar and component‑based. If you've used JSX, Astro will feel immediately natural.
A brand‑new Astro project has a simple, predictable shape:
my-astro-site/
├─ src/
│  ├─ pages/       # each file here becomes a route
│  ├─ components/  # reusable .astro (or React / Vue / Svelte)
│  ├─ layouts/     # shared page shells
│  └─ styles/
├─ public/         # static assets, served as-is
├─ astro.config.mjs
└─ package.json
And the three commands you'll use constantly:
# scaffold a new project
npm create astro@latest

# run a local dev server (usually localhost:4321)
npm run dev

# build to dist/ — pure static HTML, CSS & JS
npm run build
The last one is the key to everything that follows. npm run build produces a
dist/ folder that is just static files — HTML, CSS, JS, and assets. Static files are
trivial to host, cache, and deploy anywhere, which is precisely what makes the Cloudflare Pages part so
simple.
Part 2 — Astro's architecture
Mentally, an Astro site is a pipeline. Your source — pages, components, layouts, and content — goes in one end; a folder of static files comes out the other; and that folder is what gets served from a CDN, close to your users.
The one concept worth internalizing is islands. On most frameworks, a single interactive widget can drag the whole page into "ship the entire framework and re‑render everything in the browser" territory. Astro flips that: the page is static HTML by default, and only the components that need interactivity become hydrated islands that load their own JavaScript. Everything else stays inert and instant.
Part 3 — A Git‑driven QA → live workflow
Here's the part that makes day‑to‑day work calm: your Git branches become your deployment
pipeline. Cloudflare Pages builds your production branch (main) to your live domain,
and automatically builds every other branch — like qa — as a preview deployment with its own
URL.
- Push to
qa→ Cloudflare builds a preview you can click through and review - Merge
qaintomain→ Cloudflare builds and publishes production atyoursite.com
So your Git history is your deployment pipeline: nothing goes live that you didn't explicitly merge
to main, there are no manual uploads, and rolling back is just reverting a commit (or
re‑publishing a previous build from the dashboard). And if you want your review site on a branded
qa.yoursite.com rather than a generated preview URL, you'd add a dedicated project for the
qa branch — more on that in Step 7.
qa deploys a review site; merging to main deploys production. Your commits control both environments.In practice, the whole loop is four commands:
# 1) do your work on the qa branch
git checkout qa
git add -A && git commit -m "Update the homepage"
git push origin qa            # → Cloudflare deploys the QA site

# 2) happy with qa? merge to main to go live
git checkout main
git merge --ff-only qa
git push origin main          # → Cloudflare deploys production
Part 4 — Hosting on Cloudflare Pages, step by step
Cloudflare Pages builds your Astro site from GitHub and serves it from Cloudflare's global network — with a generous free tier, automatic HTTPS, and deploy‑on‑push built in. Here's the full setup.
Step 1 — Put your Astro site on GitHub
Create a repository on GitHub and push your project to it. If you built with npm create astro@latest,
you already have a Git repo locally; just add the remote and push. We recommend creating both branches up
front — main for production and qa for review.
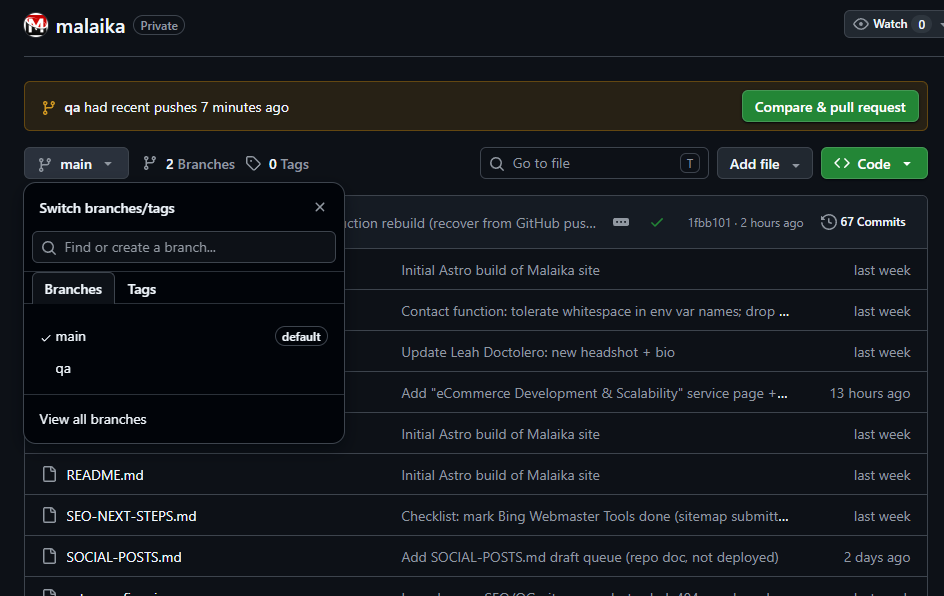
main branch for production and a qa branch for review.Step 2 — Create a Cloudflare Pages project
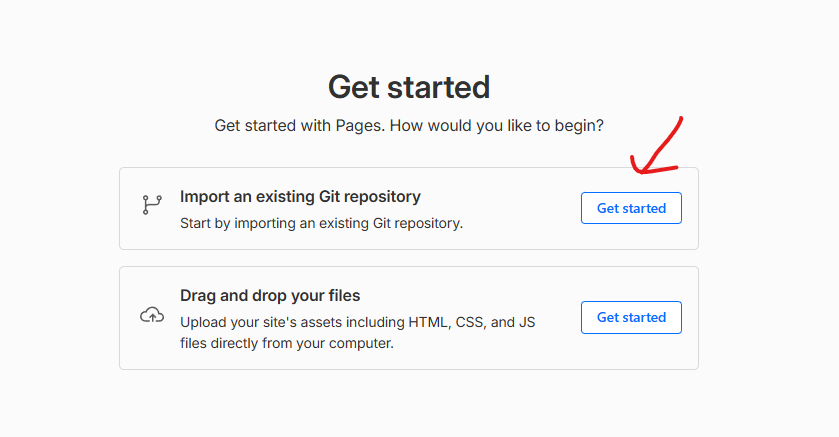
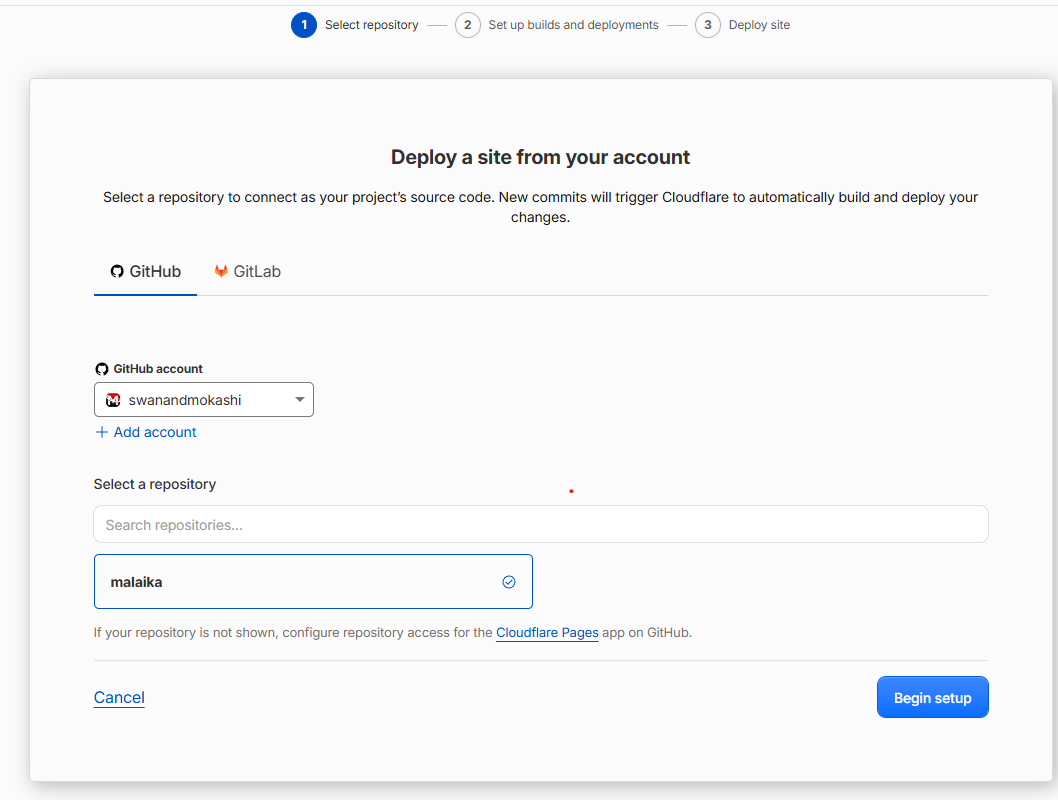
In the Cloudflare dashboard, go to Workers & Pages → Create → Pages → Connect to Git. Authorize Cloudflare to access GitHub, then select your repository.
Step 3 — Configure the build
Point Cloudflare at Astro's build. The settings that matter:
- Framework preset: Astro (this fills in the rest for you).
- Build command:
npm run build - Build output directory:
dist - Production branch:
main
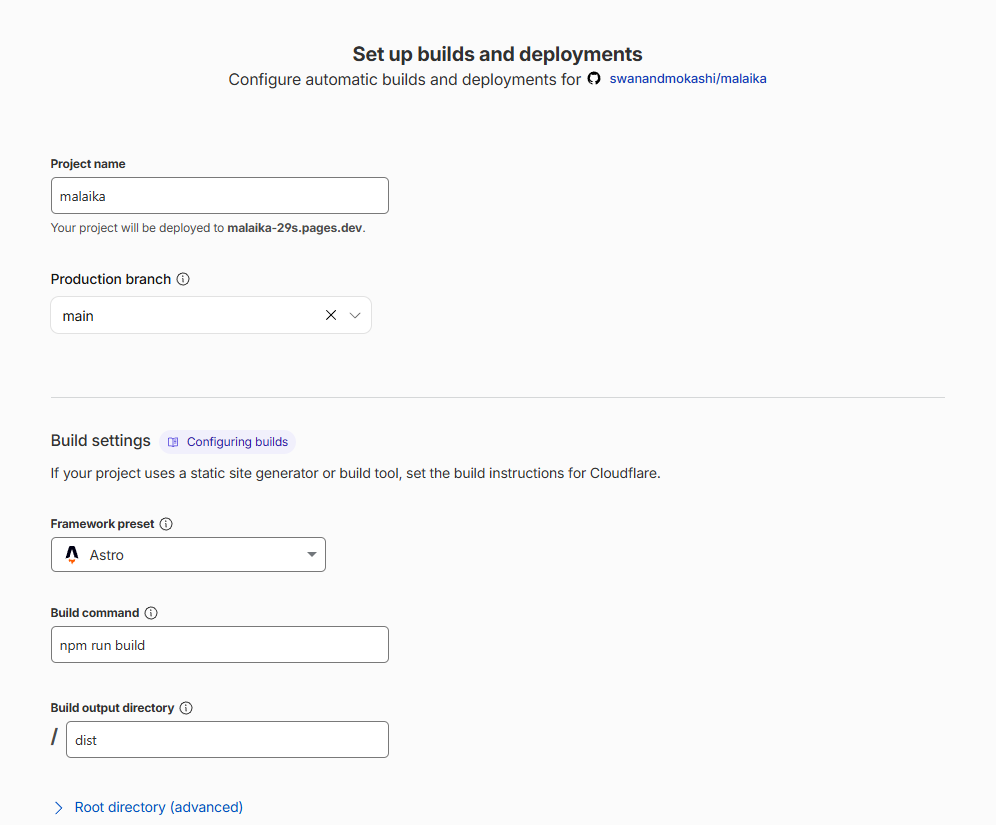
npm run build, output directory dist, production branch main.Step 4 — Add environment variables (if you need them)
If your site uses environment variables — an analytics ID, an API key — add them under the project's settings. One important gotcha: on Cloudflare Pages, variables are baked in when a deployment builds, so after adding or changing one you must trigger a fresh deploy for it to take effect.
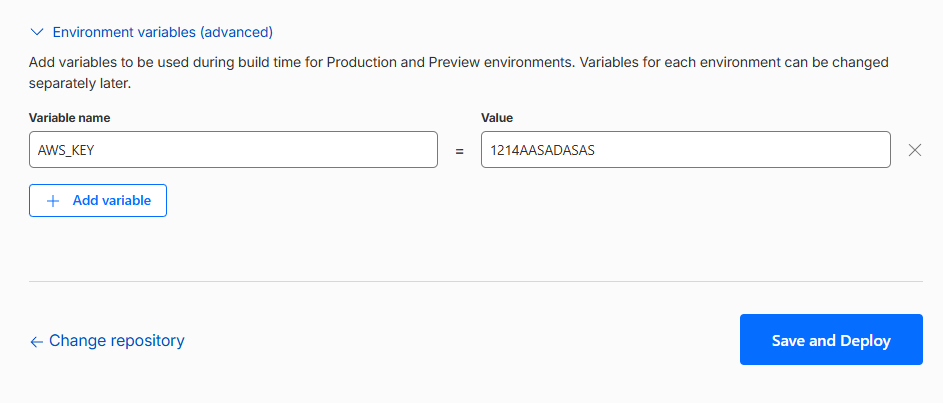
Step 5 — Deploy
Click Save and Deploy. Cloudflare pulls your repo, runs npm run build, and
publishes the dist/ output to a *.pages.dev URL. Your first build usually finishes
in a minute or two — open the URL and your site is live on the internet.
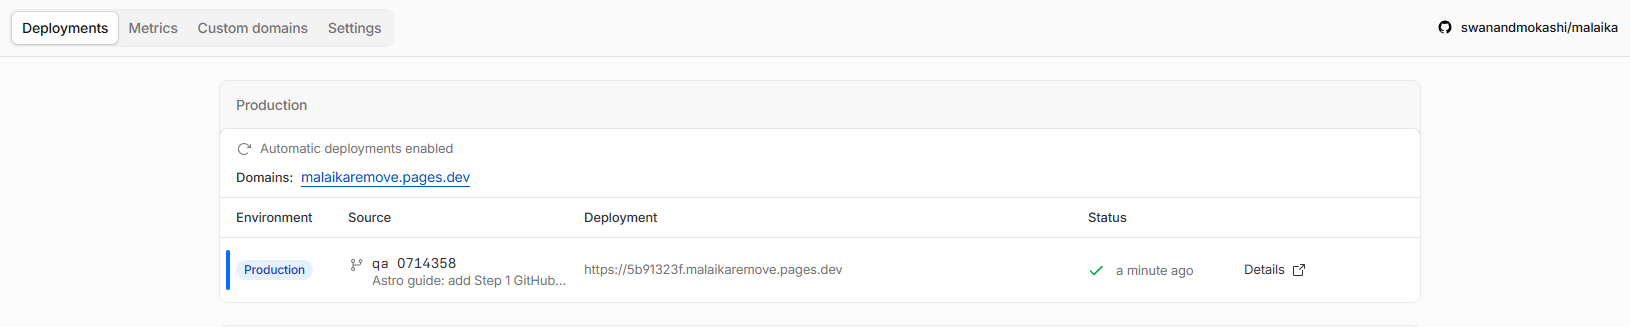
*.pages.dev URL, with a green status and a link to every deployment.Step 6 — Add your custom domain
Under Custom domains, add your production domain (yoursite.com). If your DNS is
on Cloudflare, this is a couple of clicks; HTTPS is provisioned automatically. (Tip: to make
www redirect to the apex, add a simple redirect rule for the www hostname.)
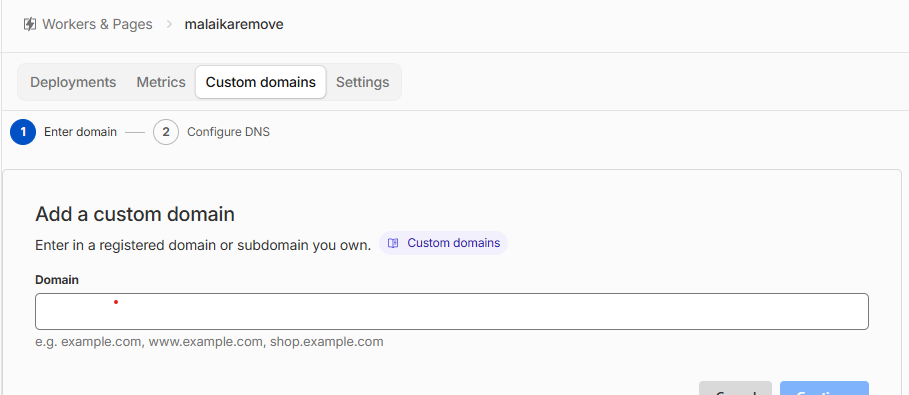
Step 7 — Get a review environment for qa
Here's the reassuring part: a Cloudflare Pages project builds your production branch to your live domain
and automatically builds every other branch — including qa — as a
Preview deployment with its own URL. So the moment you push to qa, you have a
live preview to click through before anything reaches production. Both show up in the project's Deployments
list:
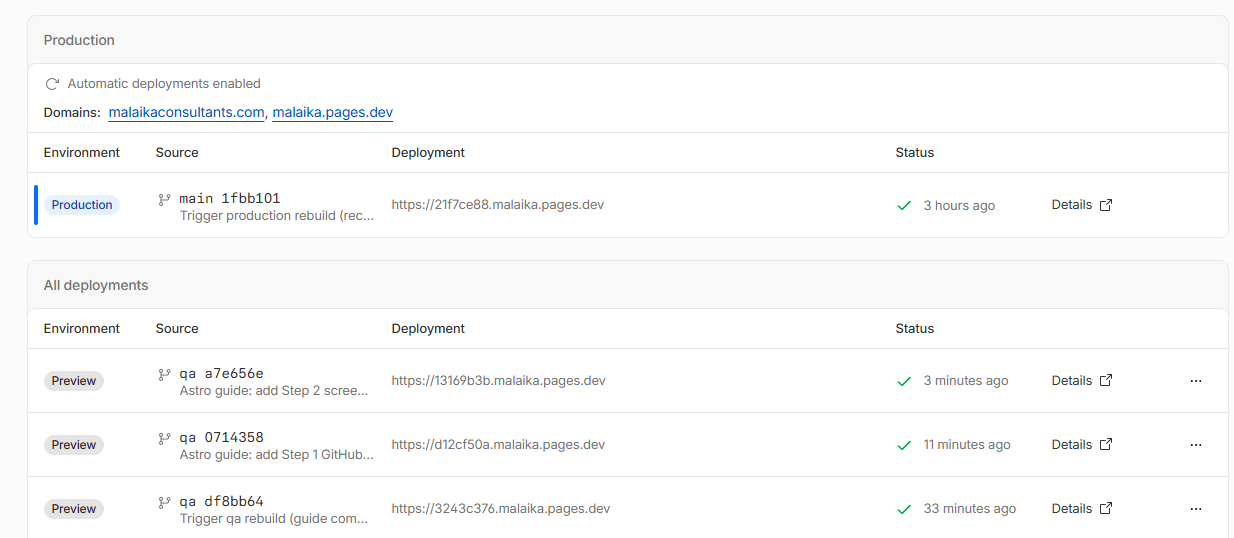
main publishes to the live domain (Production); every qa push builds a Preview deployment with its own URL — your review site, for free.
If you'd like those reviews on a tidy, memorable address like qa.yoursite.com rather than a
generated preview URL, create a second Pages project from the same repo with its
production branch set to qa, and map your subdomain to it. Either way: main is
live, and qa is where you look first.
Step 8 — You're done — the workflow runs itself
From here there's nothing manual. Push to qa and your review site rebuilds; click through it;
when it's right, merge qa into main and production rebuilds. Two branches, two
URLs, every deploy controlled by your Git history.
The payoff
That's the entire stack behind this site: a fast, static Astro build, a Git‑driven QA → live pipeline, and
Cloudflare Pages hosting on a global CDN — no server to run, near‑zero hosting cost, automatic HTTPS, and
instant rollbacks. Once it's wired up, shipping is just git push, and going live is one merge.
If you're weighing this move for your own site — or want a team to set it up and run it for you — that's exactly the kind of work we do.
Let's Talk About Your Project
A quick 30‑minute call is all it takes to find out if we're a good fit for each other. Book a time and we'll take it from there.